1Password CLI Guide: op read, op run, op inject for Secrets
Handle secrets with the 1Password CLI (op): op read for values, op run for env vars, op inject for templates, plus service accounts and troubleshooting.
This article contains affiliate links (advertising).
The 1Password CLI (the op command) lets you handle API keys and database passwords without ever writing them in plaintext to a .env file. This guide walks through three core operations: op read to pull a single value, op run to inject values as environment variables, and op inject to render templates. We also cover issuing a service account, troubleshooting, and verification. With setup included, you can move your everyday secret handling to the CLI in about 15 to 30 minutes.
Prerequisites and Secret Reference Basics
The 1Password CLI is the official command-line tool for reading secrets stored in your vaults from a terminal or script. You use 1Password with an existing account, and it runs on macOS, Windows, and Linux. The idea is simple: instead of copying a value out of the app and pasting it into a file, you keep the value in a vault and reference it from the command line. Before you start, confirm you have the following in place.
- A 1Password account (Individual, Teams, or Business)
- The op command (1Password CLI) installed (official installer, Homebrew's
brew install 1password-cli, or a package manager on Linux) - One authentication method: desktop app integration for interactive local use, or a service account token for unattended environments like CI and containers
- The secret you want already stored in a vault
The two authentication methods matter more than they first appear. Desktop app integration is the friendly path for a developer working at their own machine: you unlock the desktop app, and the CLI borrows that session, so biometric unlock and your existing vaults just work. A service account is the headless path: it carries its own token and never touches the desktop app, which is exactly what you want inside a container image or a CI runner where no human is present to approve a prompt. Many teams use both, one per context, and that is perfectly normal.
You point to a secret with a secret reference in the form op://<Vault>/<Item>/<field>1. For example, op://Development/Database/password targets the password field of the Database item in the Development vault. To define one term: a secret reference is a path that points to where a value lives, not the value itself. That distinction is the whole trick, because a reference is safe to write down, commit, and share, while the value behind it never leaves 1Password until the moment you run a command. Learn this format once and you reuse it across op read, op run, and op inject2. If you are unsure a reference is correct, copy it straight from an item's field menu in the app rather than typing it by hand.
Set Up op With a Service Account
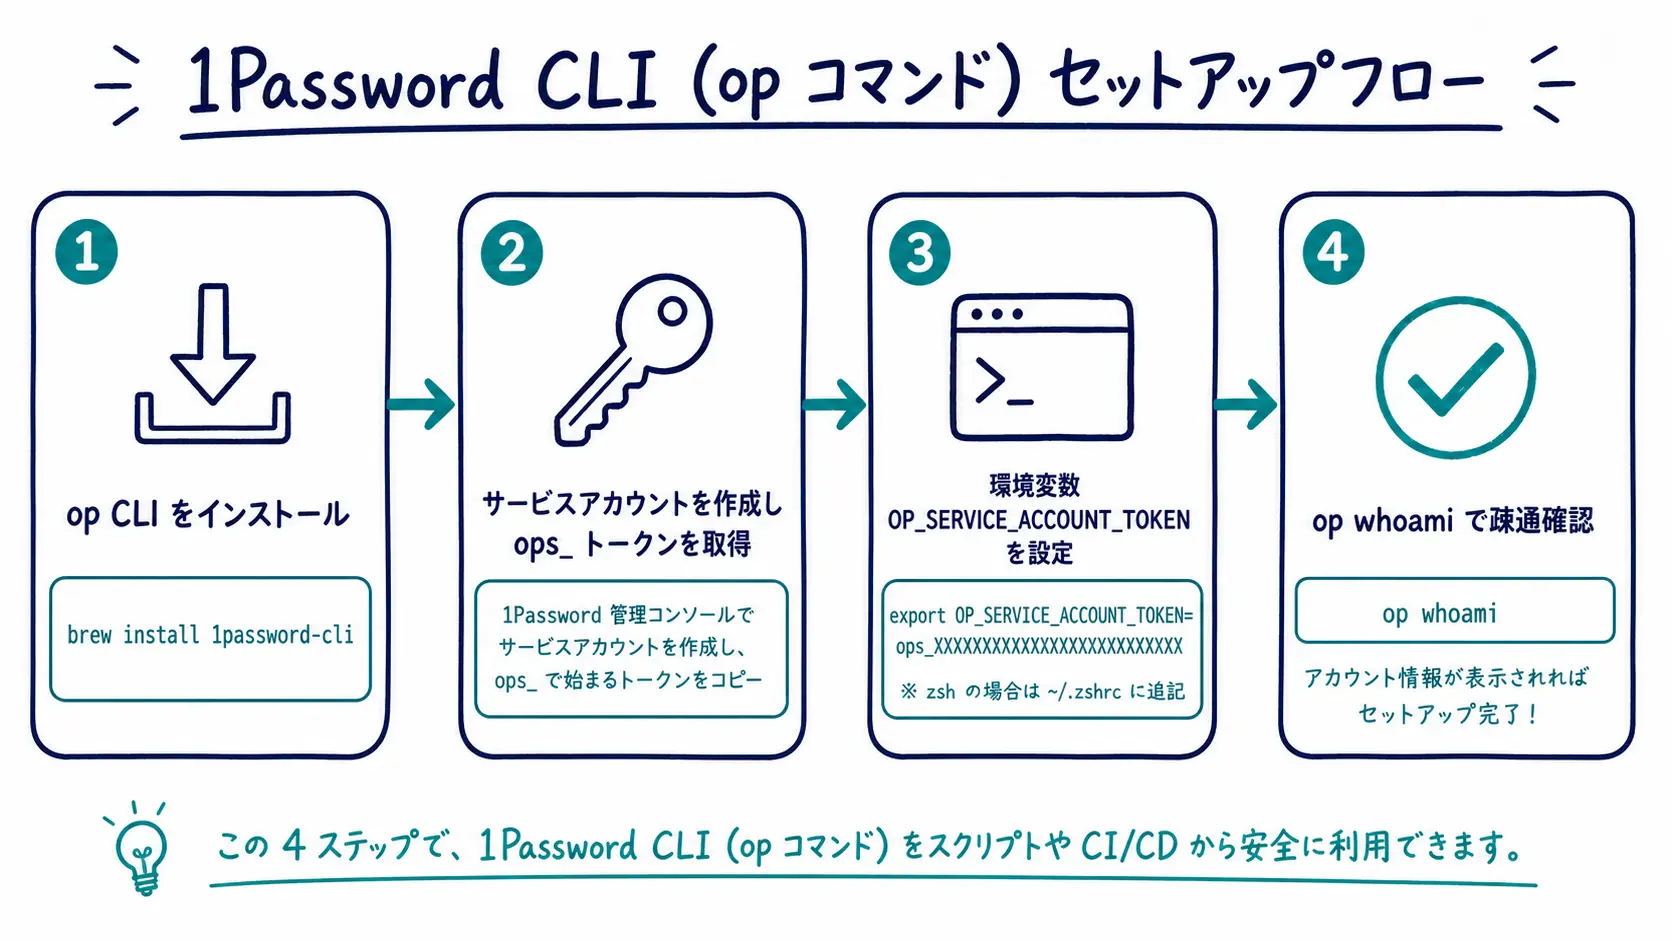
For unattended use, authenticate with a service account (a token that starts with ops_) instead of a personal login. The steps below take you from install to a working connection, and each one maps to a concrete command you can copy.
- Install the op CLI (on macOS,
brew install 1password-cli; confirm it landed withop --version). - Choose an auth method. For interactive local use, enable desktop app integration and run
op signin; for CI or containers, use the service account below. - Create a service account and copy its
ops_token. Scope the account to only the vaults the app needs, not your entire library, so a leaked token exposes as little as possible (least privilege)3. - Set the token as an environment variable. Avoid hardcoding it in
~/.zshrc; inject it via direnv for a per-project value, or a CI secret store such as GitHub Secrets so it never lands in the repo. - Confirm auth with
op whoami, which prints the account the current session resolves to.
# Install (macOS / Homebrew)
brew install 1password-cli

# Set the service account token as an environment variable
export OP_SERVICE_ACCOUNT_TOKEN="ops_xxxxxxxxxxxxxxxxxxxxxxxxxxxx"

# Verify authentication
op whoami
Treat the token like the master key it is. Because a single ops_ string is enough to read every vault the account can reach, it belongs in a secret manager or CI vault, not in shell history or a committed dotfile. Rotating it is cheap, so err on the side of issuing a fresh, tightly scoped account per project rather than reusing one broad token everywhere.
If you want to design the wider CI/CD or container picture, including when to reach for the Connect server instead, we cover the full architecture in Secrets Automation and CI integration. This article stays focused on day-to-day use of the op command itself.
"For the latest official guides, see the 1Password CLI documentation, especially the service account and developer sections." (Japanese: 最新の公式ガイドは 1Password CLI ドキュメント、特にサービスアカウントと開発者向けセクションを参照してほしい。)
As the official account notes, specifics can change, so confirm token handling and access design against the current service account documentation3 before you standardize a workflow across a team.
Choosing Between op read, op run, and op inject
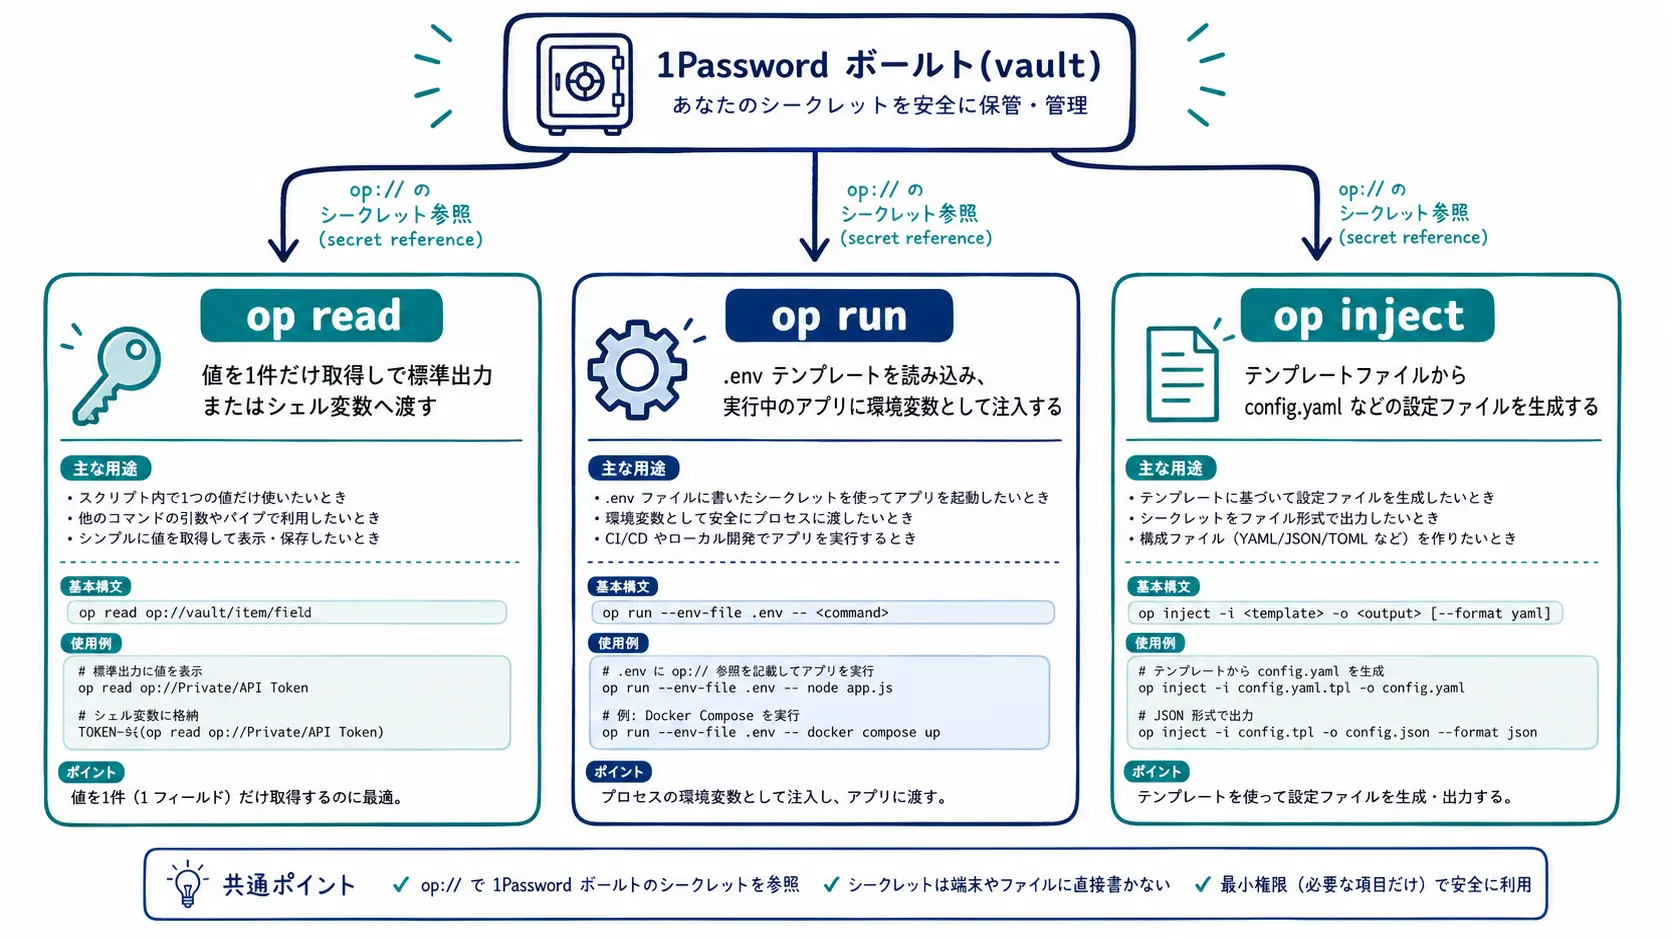
The three commands look similar but differ in what they return and where they fit. Getting the mental model right up front saves a lot of second-guessing later, so start with the overview table.
| Command | What it does | Best for |
|---|---|---|
op read | Resolves one secret reference and prints the value to stdout | Scripts needing one or two values / debugging |
op run | Reads a template and injects values as env vars into a child process | Local development at app startup |
op inject | Replaces references in a template with real values and writes a file | Generating config files (YAML/JSON) |
As a rule of thumb, op run fits local developers, while a service account plus op read / op inject fits CI and container operators. Conversely, if you only occasionally need to view a single value, the desktop app is enough and the CLI is not required. Pick the smallest tool for the job and you avoid over-engineering a workflow you will have to maintain.
op read — Pull a Single Value
When you need one value, op read is the shortest path4. Assigning it to a shell variable is the classic pattern, and it composes cleanly with the rest of your script.
op read "op://Development/Database/password"
export DATABASE_PASSWORD=$(op read "op://Development/Database/password")

# Write a key straight to a file, no trailing newline
op read "op://Private/SSH Key/private key" --no-newline --out-file id_ed25519
Two flags earn their keep here. --no-newline prevents a stray line break from corrupting keys and tokens, and --out-file writes the value directly to disk so it never sits in your shell history or a process list. One caveat: op read prints plaintext to stdout, so for a full application prefer op run, which keeps values out of your terminal scrollback entirely. You can also pull keys you manage in 1Password, such as SSH private keys, with op read. Centralizing SSH keys themselves is covered in managing SSH keys with 1Password, so review that if you want to rework key operations end to end.
op run — Inject as Environment Variables
op run is the one you will use most in local development. In the template (for example .env.op), write references, not values.
DATABASE_URL=op://Development/Database/url
API_KEY=op://Development/Stripe/production-key
op run --env-file=.env.op -- npm run dev
1Password's op run resolves these references at runtime and passes them to your app as environment variables without leaving plaintext on disk5. The mechanics are worth understanding: op run reads the op:// references using your session or service account token, spawns the command you pass after --, and hands the resolved values to that child process as real environment variables. Nothing is written back to your .env file, and the secrets exist only for the life of the process. Because the template holds only references, it is safe to commit to your repository, which means a new teammate can clone the repo, run one command, and be productive without anyone shuttling secrets over chat.
"1Password Developer features let you mount .env files directly in the desktop app without any CLI setup or plaintext files on disk." (Japanese: 1Password Developer 機能を使えば、CLI 設定や平文ファイルなしでデスクトップアプリから直接 .env をマウントできる。)
The push to drop plaintext .env files is happening in both the CLI and the desktop app, so local development can now handle secrets the way production does. For headless environments, containers, and CI pipelines, though, the op run and service account combination remains the dependable default because it needs no GUI at all.
op inject — Render Into Config Files
When a tool insists on a real config file rather than environment variables, use op inject. It replaces {{ op://... }} placeholders in a template with real values on output, which is ideal for YAML or JSON configs that some frameworks require.
# config.template.yaml
database:
  password: "{{ op://Development/Database/password }}"
  host: "{{ op://Development/Database/host }}"
op inject -i config.template.yaml -o config.yaml
Keep the template in version control and add the rendered config.yaml to .gitignore, so the file with real values is generated on demand and never committed. Regenerate it whenever a secret rotates, and you have a repeatable, auditable path from vault to config.
Troubleshooting Quick Reference
Here are the common snags right after setup, mapped to cause and fix. Most trace back to permissions, an environment variable, or an outdated CLI, so work through those three before assuming anything exotic.
| Symptom / error | Likely cause | Fix |
|---|---|---|
| Item not found | The service account lacks access to that vault | Add the vault to its access, or check the vault name you reference |
| Auth error / token rejected | OP_SERVICE_ACCOUNT_TOKEN is not set in the current shell | Check with echo $OP_SERVICE_ACCOUNT_TOKEN and re-export it |
| Command behaves oddly | The CLI version is outdated | Update with brew upgrade 1password-cli or similar |
| op run yields an empty value | Wrong secret reference path (Vault/Item/field) | Test the same reference with op read to isolate it |
This isolation is possible because 1Password uses the single op:// format across every command. If op run misbehaves, pass the same reference to op read; if it resolves on its own, you know the problem is the path rather than permissions. That one habit, testing a reference in isolation, resolves the majority of setup issues in seconds, and it keeps you from blaming the tool when a vault name simply has a typo.
Verification and Rollback
Once configured, verify that values actually resolve. Confirm your identity with op whoami, and if op read returns a single value, connectivity is fine. Running those two commands before wiring the CLI into CI prevents a lot of surprises, because a pipeline that fails at 2 a.m. on a missing token is far more painful than a 30-second check on your laptop.
If a token leaks or you granted too much access, revoke that service account token in the 1Password admin console and issue a new one. The secrets themselves stay in the vault, so you recover by swapping the token alone rather than rebuilding anything. This is the reassuring part of the model: your source of truth never moves, and rotation is a routine, low-risk operation rather than an emergency.
Combining op with AI agents or an MCP server to automate secret retrieval end to end is covered in secrets management for the AI agent era. Get comfortable with the three commands here first, then move on to that more advanced pattern once the basics feel automatic.
Summary
1Password's op command covers nearly all everyday secret handling once you know three moves: op read for a single value, op run for environment variables, and op inject for templates. The shared language is one secret reference format, op://<Vault>/<Item>/<field>. Start with desktop app integration or a small service account, try op read and op run, and retire your plaintext .env files gradually rather than in one risky sweep. When something breaks, check the three usual suspects in the reference table: permissions, environment variables, and CLI version.
Information current as of 2026-07-07. Please check the official sites for the latest updates.
This article contains affiliate links.
Footnotes
-
1Password Developer — Use secret references with the 1Password CLI. https://developer.1password.com/docs/cli/secret-references/ ↩
-
1Password Developer — Get started with 1Password CLI. https://developer.1password.com/docs/cli/get-started/ ↩
-
1Password Developer — Get started with 1Password Service Accounts. https://developer.1password.com/docs/service-accounts/get-started/ ↩ ↩2
-
1Password Developer — op read command reference. https://developer.1password.com/docs/cli/reference/commands/read/ ↩
-
1Password Developer — Load secrets into the environment with op run. https://developer.1password.com/docs/cli/secrets-environment-variables/ ↩
Frequently asked questions
Related articles
1Password Secrets Automation in CI 2026 — Service Accounts, Connect, and the New MCP Server
1Password SSH Key Management 2026 — Developer Tools Complete Guide