How to Migrate from Bitwarden to 1Password in 2026 — JSON Export, Passkey & TOTP Caveats
How to move from Bitwarden to 1Password with the official importer (May 2026): encrypted JSON export and import, plus rebuilding passkeys, TOTP, Sends, and attachments.
This article contains affiliate links (advertising).
Bitwarden is a solid, free, open-source password manager — but a steady stream of users move to 1Password for more reliable browser autofill and a stronger CLI/SSH developer experience. This guide walks through migrating from Bitwarden to 1Password using the official importer as of May 2026: exporting vault.json, running the import, rebuilding what does not transfer (passkeys, TOTP, Sends, attachments), and cleaning up afterward. If you are still deciding, our full 1Password vs Bitwarden 2026 comparison covers pricing and security side by side first.
Why Switch From Bitwarden to 1Password
Bitwarden's free tier and open-source nature are real strengths, and for cost-first users it is a strong pick. The people who still move to 1Password do so for two reasons: day-to-day UX and developer experience (DX). Unlike a LastPass migration, a Bitwarden move is not an escape from a security incident — it is a deliberate upgrade in experience.
Autofill Reliability and UX
A recurring theme on X is that Bitwarden's browser-extension autofill feels inconsistent, while users who switch describe 1Password as dramatically smoother. The gap most people cite is in login-form detection and fill reliability.
"Bitwarden's UX is poor; moving to 1Password made it 10x less painful." (Paraphrase of the original post.)
Developer Features (CLI and SSH Agent)
For developers, the op CLI, SSH agent integration, and Git commit signing are often the deciding factors. Engineers who used Bitwarden for years report switching specifically for these. 1Password manages SSH keys directly in the vault and feeds them to the terminal and Git signing, so it embeds far deeper into a real development workflow.
"Used Bitwarden for years, but the dev experience around the CLI and SSH is light years ahead — so I switched to 1Password." (Paraphrase of the original post.)
1Password Covers Part of Your Old Subscription
On price, Bitwarden wins, so weigh the cost honestly. That said, for switches from Bitwarden, LastPass, or Dashlane, the 1Password switch program reimburses part of your prior subscription cost — a useful option if you would rather not eat the overlap between two paid plans.
Pre-Migration Checklist
Bitwarden lets you pull everything out via a JSON export, but two things matter up front: 1Password only ingests the encrypted (password-protected) JSON, and some items simply do not transfer. Follow the official "Move from Bitwarden to 1Password" guide to prepare1.
1. Your 1Password Account and Desktop App
Create a paid 1Password account (Individual, Families, Teams, or Business) first, then install the macOS/Windows/Linux desktop app. Importing in a browser alone is possible, but 1Password recommends the desktop app1. For team rollouts, decide which destination vault (Personal vs Shared) each member uses at this stage to avoid reshuffling later.
2. Confirm the Bitwarden Export Format
Bitwarden exports in several formats, including ".json (Encrypted)", ".json (plaintext)", ".csv", and ".zip (with attachments)". The format 1Password ingests is the password-protected encrypted JSON (.json (Encrypted) + Password protected)1. Unencrypted JSON and account-restricted exports are not currently supported. CSV handles custom fields and TOTP poorly, so do not use it for the move; if you need attachment bodies, also prepare a .zip (with attachments) export2. The export file holds all your secrets, so handle it carefully even though it is encrypted.
3. Map the Items That Will Not Transfer
Some Bitwarden-specific features do not move to 1Password. As detailed below, list passkeys, Bitwarden Sends, some attachments, and parts of TOTP as "rebuild manually" items before you start, so nothing falls through the cracks afterward.
The 5-Step Migration (Official Importer)
Here is the core flow. Start with the five-step overview before touching anything.

Step 1. Export vault.json From Bitwarden
In the Bitwarden web vault or desktop app, open Tools > Export Vault, choose the ".json (Encrypted)" format, and select the "Password protected" export type. Set a strong export password and export (you will need this password during import). If you also use an Organization vault, note that personal and organization vaults must be exported separately. The resulting bitwarden_encrypted_export_*.json is a sensitive file, so save it only to local desktop storage — never to a cloud-synced folder.
Step 2. Launch the Bitwarden Importer in 1Password
Open File > Import in the 1Password desktop app and choose Bitwarden as the source1. Point it at your bitwarden_encrypted_export_*.json and enter the export password you set in Step 1. Then select the destination 1Password account and vault. 1Password decrypts the file and maps entries to Login, Secure Note, Card, and Identity item types.
Step 3. Run the Import and Verify Item Types
Press "Import" to begin. Bitwarden items convert to 1Password types roughly as follows.
| Bitwarden item | 1Password type |
|---|---|
| Login | Login |
| Card | Credit Card |
| Identity | Identity |
| Secure Note | Secure Note |
| Custom fields | Custom fields within the matching item |
| Folders | Tags (converted to tags, not vault structure) |
Bitwarden Folders come in as tags in 1Password. If you want to reproduce a folder hierarchy as a vault structure, it is more reliable to split vaults manually after the import.
Step 4. Check for Missed Passkeys, Sends, Attachments, and TOTP
The official importer moves your passwords, but the following are not migrated or may be dropped. Reconcile against this list immediately after import.
- Passkeys: included in Bitwarden's JSON export, but the current 1Password Bitwarden importer does not import them — re-enroll them in 1Password per service
- Bitwarden Sends: time-limited share links with no direct 1Password equivalent — not migrated
- Attachments: to include file bodies, export with the
.zip (with attachments)format, or download important files individually and re-attach - TOTP (partial): seeds (keys) can be in the JSON but the importer may miss them — re-setting them per service is the reliable path
Step 5. Securely Delete the Export File
Once the move is done, completely delete the encrypted JSON from Step 1. Even though it is encrypted, it is a sensitive file containing every item, so once you no longer need it do not leave it in the trash — empty the trash too, and confirm no copy remains in any cloud-synced or auto-backup folder.
Post-Migration Cleanup and Verification
After the import, verify the gaps and clean up Bitwarden before you switch your daily workflow over. Bitwarden carries no breach-related risk, but leaving both managers active invites the "which one is current?" mistake.
1. Confirm Critical Items Open in 1Password
Check that login items for high-impact accounts — email, banking, corporate SSO, GitHub — open correctly from 1Password. Pay special attention to TOTP, since it is a common miss: confirm 1Password alone can generate the codes. Watchtower then surfaces reused passwords, weak passwords, known breaches, and accounts that should move to passkeys in a single view — letting you triage only the risky logins in minutes even across a few hundred items, which cuts the post-migration cleanup effort right when it matters most.
2. Re-Enroll Passkeys and TOTP
Passkeys are in Bitwarden's JSON export but the current 1Password importer does not import them, and TOTP seeds can be missed by the importer too, so re-enrollment per service is the reliable path for both. On X, Japanese users have shared getting stuck precisely here — passkeys gave them trouble when moving from Bitwarden, even after they had already bought 1Password.
"I tried migrating from Bitwarden to 1Password, but the passkeys would not export — and I had already paid for 1Password." (Translation of the original Japanese post.)
The concrete re-enrollment steps:
- Open the login item in 1Password and sign in to the matching service
- Create a new passkey or TOTP in the service's security settings
- Store the passkey in 1Password, or scan the TOTP QR code into 1Password
- Save the recovery codes inside the same 1Password item
- Remove the old entry and authenticator registration from Bitwarden
3. Delete the Bitwarden Account
Once 1Password is stable and you have rebuilt passkeys, TOTP, and attachments, delete your Bitwarden account. Rather than wiping it instantly, keep an encrypted export (.json (encrypted)) locally as a safety net. If you used an Organization vault, confirm every member has finished migrating before deleting the organization.
Choosing by the Bitwarden vs 1Password Differences
Before committing, understanding each tool's character makes the decision easier. Bitwarden's strength is breadth of choice — open source, a free tier, and self-hosting via Vaultwarden — which keeps a loyal base among cost-first individuals and people who want to run their own server. 1Password, by contrast, differentiates on its Secret Key plus master-password two-layer model, a polished UX, developer integrations including the CLI and SSH agent, and operational visibility through Watchtower.
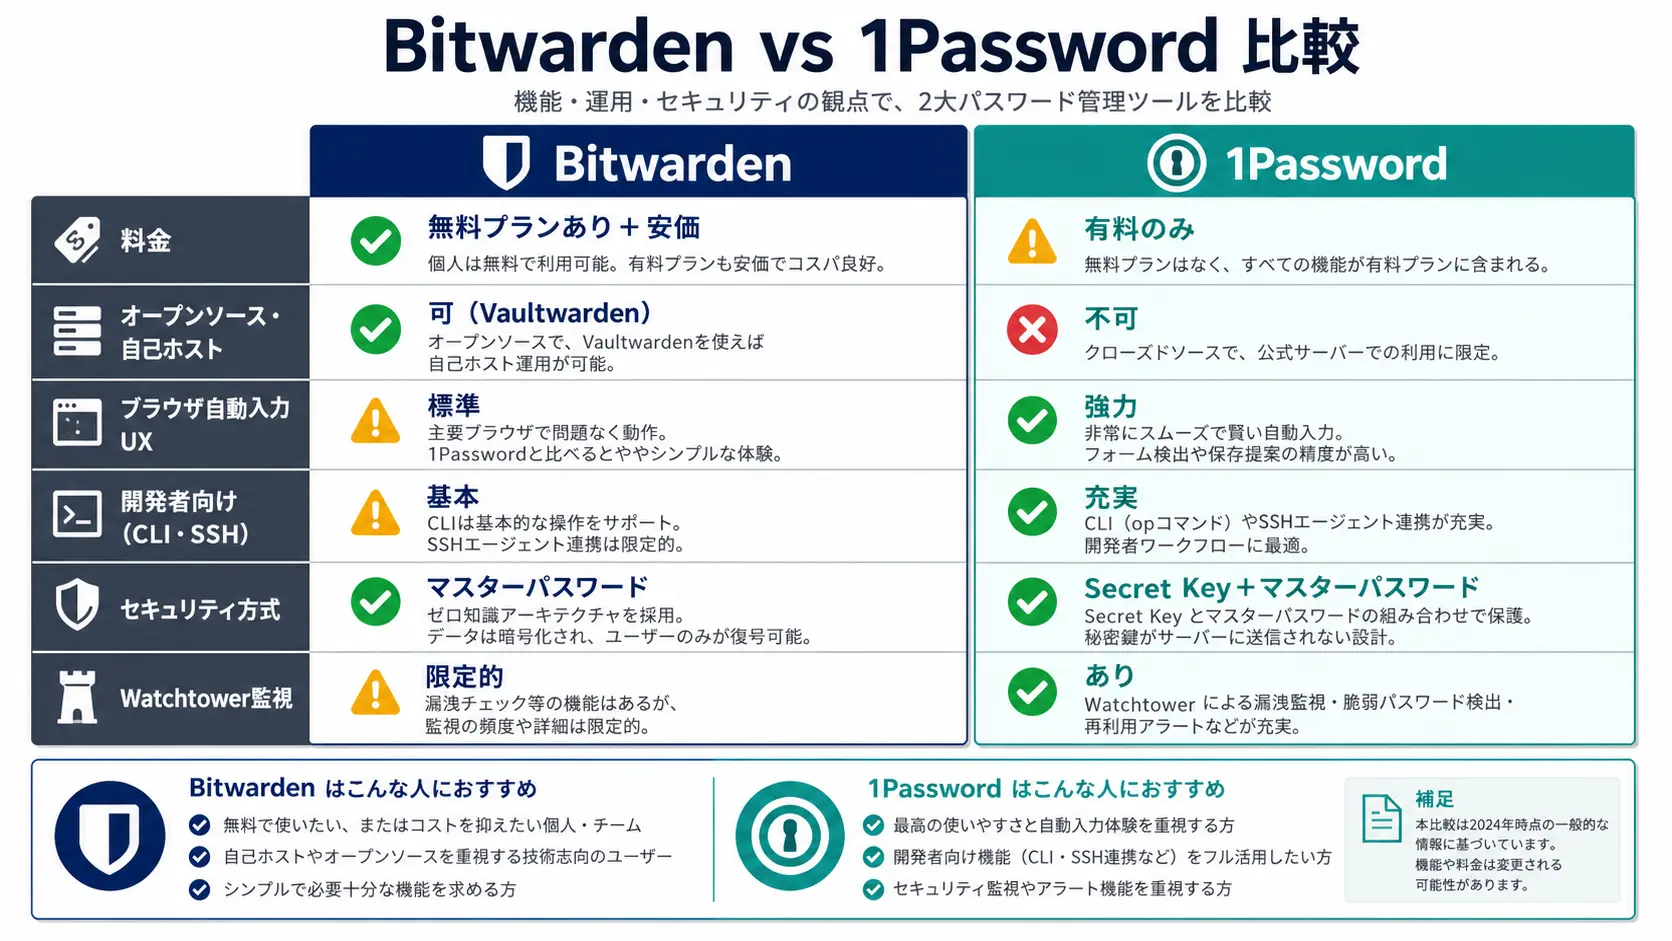
On price, Bitwarden genuinely wins, and caution about 1Password's post-increase monthly cost is common on X. With both laid out, our detailed breakdown across pricing, security, and operations lives in 1Password vs Bitwarden 2026. And if you are weighing a move from LastPass rather than Bitwarden, How to Migrate from LastPass to 1Password in 2026 follows the same flow.
Wrap-Up — Separate "Data Move" From "Passkey/TOTP Rebuild"
A Bitwarden-to-1Password migration is mostly automated: route the encrypted (password-protected) JSON through the official importer and most passwords and secure notes come over in one pass. What matters is separating the items that do not transfer (passkeys, Bitwarden Sends, some attachments and TOTP) and reserving time to re-enroll or re-share them per service. And always fully delete the encrypted JSON file afterward.
Final decision frame:
- Data body → Route the encrypted JSON through the official importer (Steps 1–3)
- Passkey rebuild → Manual re-enrollment per service (Steps 4–5)
- TOTP rebuild → Scan each QR back into the matching 1Password item (Steps 4–5)
- Sends / attachments → Re-share Sends; use
.zip (with attachments)or download and re-attach files - Export file cleanup → Empty the encrypted JSON from the trash entirely (Step 5)
- Subscription overlap → Use the 1Password switch program to recover part of your Bitwarden spend
With the checklist and five-step flow above, the bulk of the move usually fits inside a half-day to a day, leaving the passkey/TOTP rebuild to spread across the following week. If cost is your top priority, staying on Bitwarden is a perfectly rational choice; if you value the UX and developer integration, the move to 1Password is the one that pays off.
Information current as of 2026-05-31. Please check the official sites (https://support.1password.com/import-bitwarden/) for the latest updates.
This article contains affiliate links.
Footnotes
-
1Password official help, "Move from Bitwarden to 1Password": https://support.1password.com/import-bitwarden/ ↩ ↩2 ↩3 ↩4
-
Bitwarden official help, "Export Vault Data": https://bitwarden.com/help/export-your-data/ ↩
Frequently asked questions
Related articles
1Password vs Bitwarden 2026 — Pricing, Security, and Operations Compared
How to Migrate from LastPass to 1Password in 2026 — Export, Import, and Passkey Caveats