
Bright Data Account Setup 2026: KYC to Your First Zone
2026 Bright Data setup guide: business email, Use Case wording, KYC checklist, and your first Zone, with notes from running Tra-bell on Bright Data.

This article contains affiliate links (advertising).
"My Bright Data application got stuck in KYC," and "I opened the dashboard and have no idea where to start," are two of the most common questions we receive. This article walks through Bright Data account setup, KYC review, and your first Zone as of May 2026, sequenced by the failure modes we see most often, with on-the-ground notes from running Tra-bell on Bright Data1.
Three Things to Prepare Before Signing Up
Signing up for Bright Data takes a few minutes, but how smoothly review and operations go later depends heavily on what you put into that first form. Prepare your business email, a written Use Case, and basic company evidence before you open the registration page.
Use a business email address
Registering with a free email provider (Gmail, Yahoo, and similar) is technically possible, but X reports and our own experience show it frequently triggers extra KYC questions or short-term holds when you first try a Residential product. If you plan to use Bright Data in production, register with a company or business domain email from the start. A custom domain email also helps the reviewer associate your application with the company website you submit later, which shortens the back-and-forth during verification.
Write a 2-3 sentence Use Case
The registration flow includes a "What will you use Bright Data for?" field. This becomes the entry point into compliance review. Keep it to 2-3 sentences explaining (a) industry, (b) data target, (c) approximate volume, and (d) downstream use. Examples: "Collect publicly available e-commerce prices for market research," "Track Google rank for SEO monitoring," "Aggregate public datasets for academic research." A blank line that just says "web scraping" is a frequent reason for additional review questions, and even a single specific noun (such as "publicly listed pricing on retailer sites") raises the chances of a fast pass significantly.
Gather company and business evidence
For companies, prepare your certificate of incorporation. For sole proprietors, prepare your business registration along with a personal ID. Even for side projects, a public website or landing page that describes the work helps reviewers verify business intent. KYC is a manual review process: complete documents typically clear within 1-3 business days, while gaps trigger additional rounds that can stretch into weeks. If your company website is in Japanese only, attach an English brochure or LP draft to spare the reviewer from machine-translating ambiguous wording, which is a common reason for an unnecessary follow-up email.

X is full of reports of "KYC denial and account hold" or "trying a residential product immediately triggered a review." Bright Data's compliance has tightened year over year, especially for Residential, ISP, and Mobile, so assume a KYC pass is required and prepare accordingly.
"Bright Data leans enterprise: strict KYC, account holds reported, and a relatively high minimum spend." (Original: Bright Data leans enterprise: strict KYC, account holds reported, and a relatively high minimum spend.)
End-to-End Flow From Sign-Up to KYC Approval
Here is the practical operating sequence in five steps. With smooth inputs, the active work takes 30-60 minutes; including KYC review, plan on 1-3 business days end to end.
Step 1: Fill out the sign-up form
From the brightdata.com homepage, choose "Start free trial" or "Sign up" and enter your email, full name, company name, and phone number. Use your real name and the official company name so they align with the documents you will submit during KYC.
Step 2: Use Case and volume entry
After email verification, the first dashboard session asks you to detail your Use Case. The cleanest pattern is a 2-3 sentence response covering (1) industry, (2) data targets, (3) expected monthly volume, and (4) downstream system. Volume can be a range, such as "Residential ~5-10 GB" or "Web Unlocker ~100k requests/month."
Step 3: Add a payment method
Register a credit card or, for companies, wire transfer. On PAYG there is no minimum spend, and the first few dozen dollars typically count as a small deposit. Commitment contracts are negotiated separately through a sales call. Starting on PAYG and switching after monthly usage becomes predictable is the realistic path. For a product-by-product unit price view, Bright Data Pricing Cheat Sheet 2026 lays out the unit prices and budget templates you can plug into a sizing exercise.
Step 4: Upload KYC documents
The first time you pick a Residential, ISP, or Mobile product (or within a few days of sign-up), the compliance team will email a KYC request. Standard requirements:
- Photo ID of the representative or applicant (passport or driver's license, both sides)
- Proof of address dated within the last three months (utility bill, residence record, or bank statement)
- For companies: certificate of incorporation or equivalent business license
- A live company website URL or PDF brochure showing business activity
Upload the bundle together and wait for compliance review. If the team flags "Use Case does not align with the industry" or "the website does not describe the business," they will return with follow-up questions, so make sure Step 2 and these documents tell the same story. We have seen approvals slip from two days to two weeks purely because the company website described a different product category than the Use Case text; rewriting the website "About" page is sometimes faster than going through additional rounds of clarification with the reviewer.
Step 5: Approval notification and first login
Once approved, you receive an "Account approved" email and unlock all products. Some Datacenter or Dataset Marketplace flows may work before full approval, but it is safest to wait for the approval email before kicking off production work.
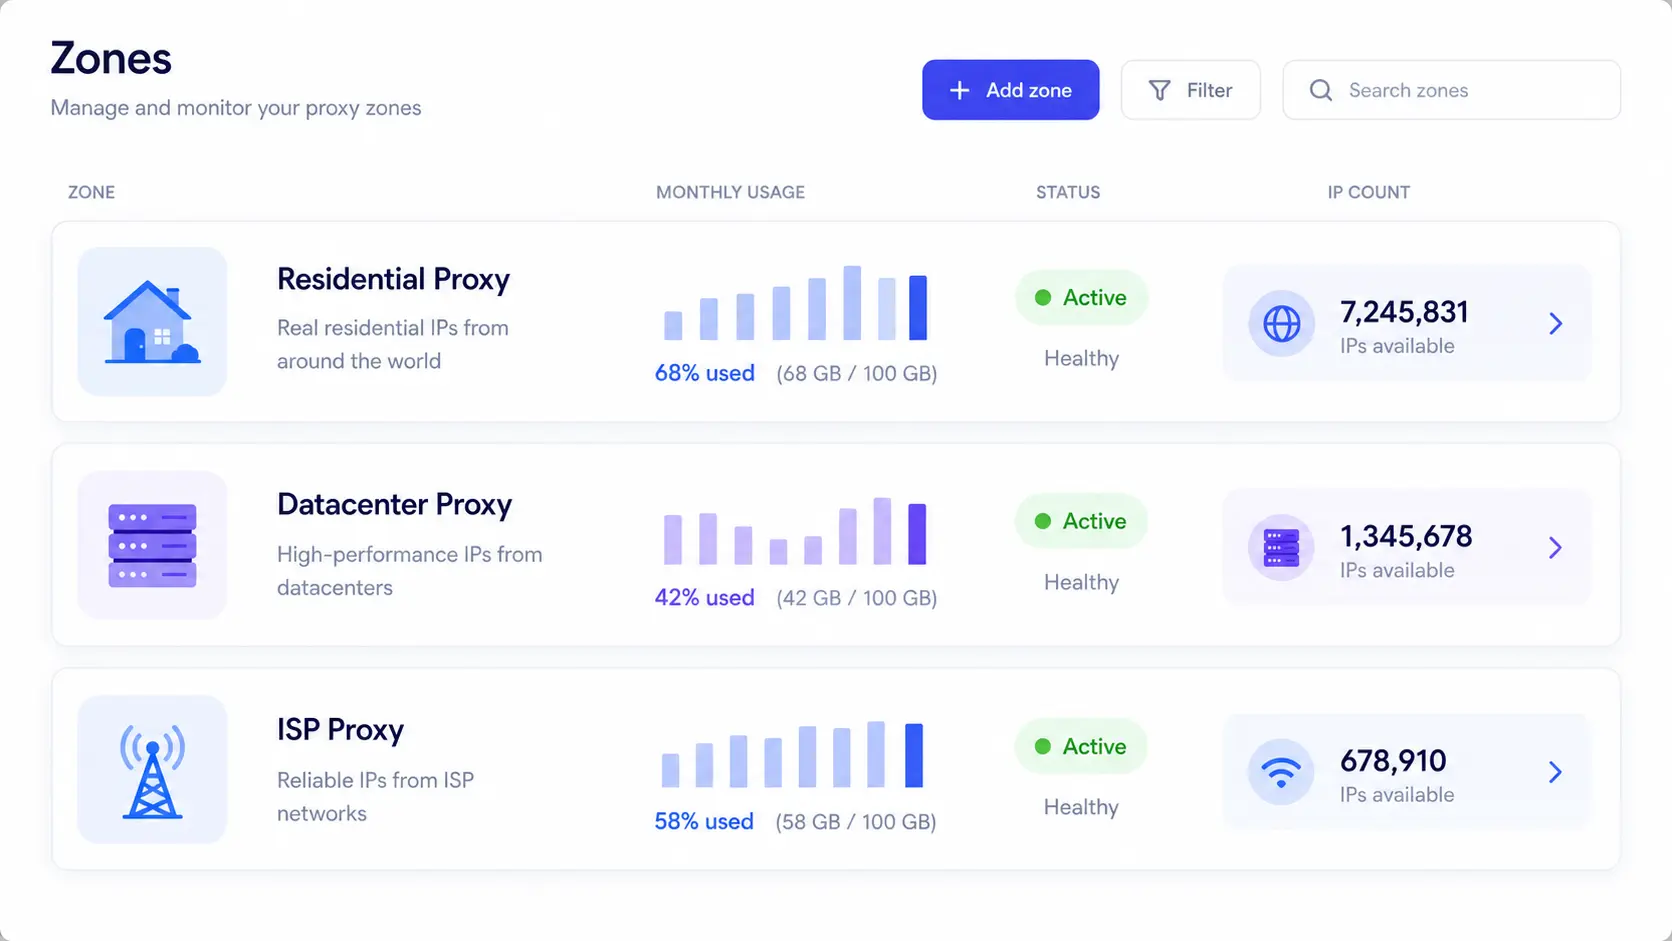
Designing Your First Zone in the Dashboard
After approval, the next move is creating your first Zone. A Zone is the Bright Data core abstraction: it bundles "proxy product x geo conditions x session settings x credentials" into one billable unit. Billing, statistics, and bandwidth monitoring are all keyed off the Zone, so splitting Zones by use case is the standard production design.
Five Choices When Creating a Zone
From the left navigation, open "Proxies & Scraping Infrastructure" then "Add" to create a Zone. The first five decisions:
- Zone name: Use a convention like
prod-pricewatch-jpthat includes purpose, environment, and region - Product type: Residential, Datacenter, ISP, Mobile, Web Unlocker, or SERP API
- Country and region: Down to ASN and city. For price monitoring, target the main market of your destination e-commerce sites
- IP rotation: Rotating (changes every request) or Sticky Session (fixed for a duration)
- Concurrent connections: Upper limit on parallel requests. Start at 10-50 and scale gradually
If you are unsure about Residential vs ISP for your workload, Bright Data Residential vs ISP Proxy 2026: A Practical Selection Guide compares them by use case in more depth.
Credentials and endpoints
When you create a Zone, the dashboard generates a username, password, host, and port automatically. The form looks like brd-customer-hl_xxxx-zone-prod_pricewatch_jp:password@brd.superproxy.io:33335, and you assemble that into your application's proxy config. In the early days, use the "Playground" tab in the dashboard to fire test requests and confirm that IPs come from the requested region and that the success rate matches expectations. Treat the Playground as your acceptance test environment: a Zone that passes 95% in Playground but fails in your application almost always points to a request-header or TLS-fingerprint mismatch rather than a Bright Data issue, and isolating that early saves hours of debugging once Web Unlocker or Scraping Browser layers are added.
Install Proxy Manager locally
For richer retry logic and country-rotation combinations, the dashboard alone can feel restrictive. Beginners benefit from running Bright Data Proxy Manager (a desktop app) alongside the dashboard. Proxy Manager surfaces request history, bandwidth usage, and error logs locally, which speeds up initial validation noticeably.
"Bright Data has a powerful dashboard but lots of knobs; many find Oxylabs faster to onboard." (Original: Bright Data has a powerful dashboard but lots of knobs; many find Oxylabs faster to onboard.)
The configurability is both a strength and a slow start. Begin with a single Zone, learn the operational rhythm, then split and tune Zones as workloads diversify.
Common Issues and a Quick Reference Table
Here are the issues that surface most often after setup, organized by symptom, likely cause, and recommended response, prioritized by frequency from X reports and our production experience.
Four Recurring Issues
| Symptom | Likely cause | Action |
|---|---|---|
| Account suddenly placed on hold | Gap between stated Use Case and actual traffic, suspected ToS violation on target sites | Re-document the Use Case for support and submit |
| KYC asks for repeated extra evidence | Business activity is not visible from documents | Update the website with company description and re-apply |
| Requests rejected with 407 after Zone creation | Malformed authentication string | Re-check the brd-customer-hl_xxx-zone-yyy syntax |
| Unexpected billing | Sticky Session held too long, very large responses | Filter images/video, switch to Rotating |
"Abusive residential traffic triggers immediate KYC and frequent account suspensions." (Original: Abusive residential traffic triggers immediate KYC and frequent account suspensions.)
For CAPTCHA handling and the decision to move workloads to Web Unlocker after launch, Bright Data CAPTCHA Handling Playbook 2026 collects per-challenge tactics that pair well with the Zone work above. The 407 case in particular is worth a dedicated runbook entry, because the same authentication string format change is the single most common reason production deployments break after a Bright Data dashboard UI update.
What We Bring to Bright Data Onboarding
We operate Tra-bell, our hotel-price-tracking service, on Bright Data's Residential proxies and Web Unlocker. From Use Case wording reviews and Zone splitting design, to break-even modeling between PAYG and commitment contracts, and embedded CAPTCHA handling logic, we can pair with teams from PoC through production rollout.
Wrap-Up: Priorities for Your First Week
A realistic timeline for Bright Data onboarding is "sign-up in minutes, KYC in days, Zone tuning ongoing." For the first week, focus on:
- Align business email, Use Case, and company evidence to pass KYC on the first try
- Run the account on PAYG, create exactly one Zone, and confirm connectivity through the Playground
- Install Proxy Manager locally to monitor request history and bandwidth
- Once monthly usage stabilizes, consider switching to a commitment contract
The Bright Data onboarding bar is high, but once past it you gain a rare end-to-end platform spanning Residential, Web Unlocker, and SERP API. With the right preparation, the initial hurdle becomes a long-term scalability advantage. Most of the slow starts we have seen came from rushing the Use Case form, not from any limitation of the product itself, and a 30-minute preparation session before opening the sign-up page is usually the single highest-leverage investment in the entire onboarding.
Information current as of 2026-05-21. Please check the official sites for the latest updates.
This article contains affiliate links.
Footnotes
-
Bright Data Official Documentation https://docs.brightdata.com/ ↩
Frequently asked questions
Related articles

Bright Data Pricing Cheat Sheet 2026: Product-by-Product Cost Guide
Bright Data Residential vs ISP Proxy 2026: A Practical Selection Guide